Hello Everyone!
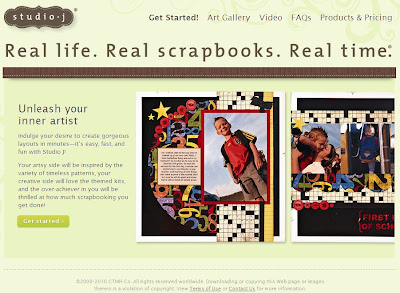
I wanted to share the article below with you. Like the author of the article, I am not an online scrapbooker, however, I have fallen in love with Studio J-Close To My Heart's new online scrapbooking program. This program is fabulous and perfect for scrapbookers, card makers and paper crafters. I encourage you to visit my website (amy.myctmh.com) and click on "Studio J") an play with the program for FREE. If you liek it than you can purchase the membership. All memberships purchased before TOMORROW, SEPT. 30th at 5:00 p.m. will receive a FREE 12 x 12 Faux Leather Album of their choice FREE!
Check this out...http://www.craftcritique.com/2010/09/scrapbooking-with-studio-j-by-close-to.html
or see article below:
September 14, 2010
Hello Everyone!
I wanted to share the article below with you. Like the author of the article, I am not an online scrapbooker, however, I have fallen in love with Studio J-Close To My Heart's new online scrapbooking program. This program is fabulous and perfect for scrapbookers, card makers and paper crafters. I encourage you to visit my website (amy.myctmh.com) and click on "Studio J") an play with the program for FREE. If you liek it than you can purchase the membership. All memberships purchased before TOMORROW, SEPT. 30th at 5:00 p.m. will receive a FREE 12 x 12 Faux Leather Album of their choice FREE!
Check this out...
http://www.craftcritique.com/2010/09/scrapbooking-with-studio-j-by-close-to.html
or see article below:
September 14, 2010
Scrapbooking with Studio J by Close To My Heart
Thanks for visiting Craft Critique! If you've come here from a search engine or from a direct link, you might be missing out on more content! Please visit CraftCritique.com. And for more amazing content such as projects, artist interviews and more, sign up for our Monthly Newsletter.
While I'm a traditional paper scrapper at heart, I have done some digi-work in the past - and I'm always open to try new things. Most recently, I've been playing with the new online scrapbooking studio by Close To My Heart called Studio J.
With Studio J, you can create two-page 12"x12" scrapbook layouts that can be printed and added to your scrapbook album. You create your layouts using the online tools, and when you purchase your layouts, they are printed by Close To My Heart, and shipped back to you in 5-7 business days (shipping times will vary by delivery address). Alternatively, if you are a Studio J Member, instead of printing by CTMH, you can choose to purchase only the digital images (high resolution JPG files) for printing elsewhere at your discretion.
The Studio J interface is completely web-based, and there is no software to buy or install. This means that anywhere you have an internet connection with the Adobe flash-player plug-in installed, you can access Studio J and work on your layouts - even from a public access computer! The software is extremely intuitive and easy to use (even if you've never scrapbooked digitally before); there is also a built-in online help area to assist you if you get stuck and a dedicated Studio J support email address if you need help beyond that.
The digital papers and embellishments pre-loaded to Studio J are all part of current or retired Close To My Heart My Reflections scrapbooking kits, as well as new CTMH kits that are exclusive to Studio J. For the current and retired kits, all of the same patterned papers and My Stickease stickers that are/were available in the classic paper versions of the kits are available within the corresponding kit in Studio J. One big bonus though, is that with the Studio papers, you have the option of changing the colour of the paper to any colour in the CTMH 60-colour palette. Now that's flexibility! These means that you customize your papers to match your photos - something that can't be done with paper.
New papers are added to Studio J with each Idea Book release - and unlike other forms of digital or online scrapbooking there is no additional charge to access the new content.
Probably one of the coolest features of Studio J is the way that you can add distressing to your pages. I personally love the look of distressed art and almost always incorporate it in some form when I am classic scrapbooking. In Studio J, it only takes a click or two and you can sand & stipple and even apply digital 'ink' direct to your patterned paper and cardstock. You cannot, however, distress your photos, which would be a cool enhancement if they decide to add it later. With Studio J you can also add digital embellishments that mimic classic metal brads, hinges & photo turns, and/or add digital buttons and ribbon & all of these embellishments can be custom-coloured to any colour in the CTMH 60-colour palette.
There is even built-in photo editor that allows you to adjust a photo's brightness and contrast, saturation, sharpness, etc. You can apply filters to change your photo from colour to black & white or sepia, and there are even tools within Studio J to brighten teeth, erase wrinkles, soften blemishes, remove red eye, and more. While you won't find ALL of the photo-editing flexibility that you'd find in a full-service specialty program like Adobe Photoshop Elements, you can certainly do more than just the basic photo editing within Studio J.
What About Print Quality?
According to Close To My Heart, Studio J layouts are processed (not printed) "using a silver-halide process considered the highest standard in the photo developing industry. Unlike printed papers or images you might find from a home printer, the silver-halide process yields a "100-year+ quality" that has long been tested and used by the top photo labs in the world." I personally have ordered several Studio J printed layouts over the last few months and I can attest that the quality is truly superb. The paper they are printed on is, in my mind, comparable to a high-quality photograph - it is not a light-weight paper or cardstock. It has a light gloss appearance; unfortunately at this time a matte finish option is not available.
What About Price?
Studio J is absolutely free to use as there is no charge until you decide to purchase your layouts. When reviewing the pricing structure it is important to remember that a Studio J layout is two 12"x12" scrapbook pages. When you print 12"x12" elsewhere, pricing is usually stated on a per page basis.
Studio J is absolutely free to use as there is no charge until you decide to purchase your layouts. When reviewing the pricing structure it is important to remember that a Studio J layout is two 12"x12" scrapbook pages. When you print 12"x12" elsewhere, pricing is usually stated on a per page basis.
There are two ways to purchase: Member & Non-Member pricing. {Follow this link to get all of the Studio J Pricing/Shipping details directly from Close To My Heart}
With Studio J Membership:
- Layout printing: $6.50 US / $7.50 CAN for a 2-page layout (includes free JPEG files for archiving & sharing) that equates to $3.25 US / $3.75 CAN per page.
- JPG Files purchased separately: $3.00 US / $3.50 CAN for a 2-page layout
- Free shipping on one minimum order per month (minimum is 4 layouts in US and 7 for Canada)
- Free Memory Protectors so your layouts are album ready.
Maximumof 10 layouts per month can be purchased at the reduced rates. Price per layouts ordered over 10 is $11.00 US / $13.00 CAN{this restriction removed effective September 24, 2010}- Cost of Membership:
- $99.00 US / $115.00 CAN for 12 months.
- $30.00 US / $35.00 CAN for 3 months
Without Studio J Membership:
- Layout printing: $13.00 US / $15.00 CAN for a 2-page layout
- Shipping per box of up to 20 layouts: $5.95 US / $13.95 CAN
- JPG files are not available to non-members
- Free shipping is not available to non-members
- Free Memory Protectors not available to non-members
{all of the above figures exclude taxes and shipping on the Memory Protector portion of the order for Non-Members}
So How Does Studio J Work?
Step 1: Upload photos. This follows the same procedure we are used to seeing in other applications: Navigate to the directory on your computer where your photos are stored, select the photos you wish to upload and press Open.
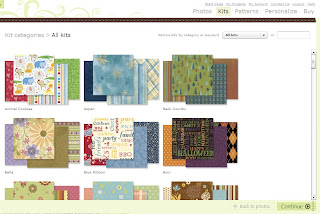
Step 2: Choose the desired themed kit. There are currently 61 kit options available with more to be added with each Idea Book release. There has been no word to my knowledge of kits being 'removed' or retiring from Studio J in the future. Here's a sampling of what you'll find. You can also 'filter' the available kits by theme; for instance only displaying kits that are themed 'Celebration' or 'Family' etc..
Step 3: Select a layout pattern. There are currently 57 layout patterns available to members, and 32 available to non-members. For every layout pattern, the pages can be swapped left to right, and/or rotated individually for an endless number of possible combinations. At present there is no functionality to 'transpose' pages (that is flip individual pages horizontally). Here is a sampling of the available layouts. Note in the top right of the screen you can filter the available layouts by number of photo wells - displaying only that layouts that would be suitable for scrapbooking the specific photos you have in mind.
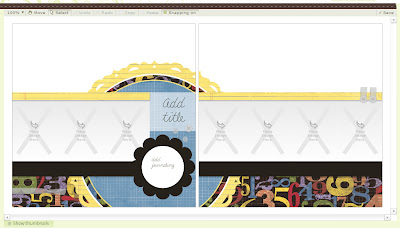
Once you have selected a kit and a layout pattern, you are then prompted to choose a suggested 'kit mix'. These kit mixes represent suggested placement of the various cardstock and patterned paper combinations available in the kit. While you must select a kit mix to start with -- you can always change things in the next stage if you are not satisfied. Here is an example of a kit mix selection screen and the resulting blank layout. For the purpose of this demonstration, I chose the exclusive to Studio J "Class Act" Kit, and the "Photo Booth" (members only) layout pattern. I chose Kit Mix #6.
Step 4: Add your photos, embellishments, title, and journaling to your page. The interface is easy to use as it is essentially drag and drop. You can see in the above image, that there are 7 photo wells on this layout, a spot to add a title, and a journaling block. You might also notice that some basic embellishments are already placed, but are 'greyed out'. In this layout there are ribbon tabs and buttons in the top right above the photos, more buttons in the center area around the title and an additional piece of ribbon (which is hard to see) in the bottom left corner. You can choose to 'colour' these embellishments as placed (using any of the CTMH 60 colours), or you may choose to delete them altogether and either print your layout without them, or change them to something different altogether or modify their placement.
Here are a some closeups of the working toolsets you will use to create your layouts.
Here is the layout I completed while pulling this demonstration together (click the image for a larger view).
{Please note: This image is shared via screenshot, and the quality is thus not suitable for printing. It is not indicative of the image resolution of purchased JPG files.}
A few things I'd like to point out.
- The kit I opted to use is actually themed for Back to School, but here is proof that it can work equally well for non school-related photos.
- I changed the background cardstock from white to black and then 'sanded' it.
- In the suggested kit mix, the paper border above the photos and in the circle was yellow, and I changed it to green.
- I 'Grunged Up' the green paper further by adding edge distressing and stippling in Black 'ink'. converted the 'Add Title' journaling box to a photo well.
- I removed the 'Add Journaling' circle to make room for my title, which I placed on the layout in a position other than what was suggested.
- I added a transparent journaling box in the top right of the layout that was not in the original sketch.
- I added an additional border below the photos by using the ruler border sticker that is included in the Studio kit.
- The word Journey in my title was created using the Studio J Quick Title tool which uses the kit letter stickers and automatically aligns and evenly spaces the letters (this is so easy and convenient!)
- I removed the ribbon tabs from the top right of the layout, but left the ribbon scrap in the bottom left and added a couple of Star stickers from the available kit stickers.
Step 5: Purchase custom-printed layouts ready for a cherished album and/or order digital images for printing elsewhere (Members only).
So what's the bottom line?
Is Studio J worth trying? Yes. There is a ton of functionality built into this online interface that will have you creating layouts unthinkably fast. The layout possibilities are countless and even if you use the same layout pattern or kit again and again you can make each layout unique. With membership, print pricing is competitive. Locally, I can print 12x12 pages at Costco for $2.99 per page. Studio J Members pay $3.75 per printed page ($7.50 for a 2-page layout). The way I see it, for the extra $0.76 over Costco, Studio J gives me great value considering that I did not have to invest in software or digital elements, and I am receiving free Memory Protectors with my order. The quality of the Studio J print is stellar, and I have been more than satisfied to date. I have not yet had opportunity to purchase the JPGs so cannot comment as to their resolution etc., but CTMH advertises that they are high resolution suitable for printing. Unfortunately, without membership, the cost to print and ship layouts may be prohibitive.
Are you ready to try it out for yourself? Visit Studio J now and try it for free. There is no charge until you decide to make a purchase.
Is there room for improvement? Yes, but a product as young as this one with likely improve greatly over time, as user feedback is received. In fact, we've already seen tremendous improvement since the initial product launch in April 2010. Here are some things that I would like to see improved or changed hopefully in the very near future.
- Add the ability to Fully Justify text in a journaling box. In many cases I prefer that look. Currently only right-, left- and centered-alignment are available options.
- Add the ability to add a photo well. Currently photos can only be positioned in existing photo wells, or by converting journaling slots to photo wells.
- Add functionality for creating pages from scratch if desired.
- Allow the user to 'zoom' a layout using the mouse wheel. Currently there is a zoom slider in the top left of the screen, but mouse wheel zooming would be much more convenient.
- Allow the user to add/define drop shadows to give the printed layouts further depth. I think that some of the current printed embellishments (e.g. buttons) look a little 'flat'.
Pros:
- With Membership, the cost of printing Studio J layouts is basically comparable to getting scrapbook layouts printed elsewhere especially since you get bonuses like free Memory Protectors, and you consider that there is no upfront software investment.
- The interface is extremely easy to use, even for an individual with limited computer experience.
- The 'Studio' is is portable. As long as you have internet access (even from a public access computer), you can create/edit your scrapbook layouts.
- You can customize the digital papers to coordinate with your photos by changing the colour of a selected pattern with just the click of a button.
- No need to purchase templates, scrapbooking papers or embellishments separately. There are 61 'kits' available to members as of today, and more will be added with each CTMH Idea Book release.
- You can order prints of your layouts without any 'digital' embellishments and add 'classic' embellishments later for hybrid pages. If you use CTMH classic accessories and embellishments, the colours will coordinate perfectly since they are from the same colour palette.
- You cannot change the size of photo wells (although you can convert a photo to text)
- Single page layouts are not available - all templates and order pricing are based on 2-pagers.
- You can design/print scrapbook layouts only - no cards.
- Currently 12"x12" is the only available print size.
- No matte finish processing option for printed pages.
- No option to print a bound photo book.
- You cannot mix papers/stickers from more than one kit on the same layout.
- Without membership, you cannot purchase JPG files of your layout, and the price of printing layouts (without membership) is less than competitive.
Have you tried Studio J? What are your thoughts? Do you agree with my opinions? Let us know by leaving a comment below.


1 Comments:
This just in.....Great News for Studio J Members. To help make Studio J® as user-friendly as possible, Close To My Heart is removing restrictions on the number of layouts members can purchase at 50% off each month. Beginning at 9:00 am (MDT), Friday, September 24, members are no longer limited to 10 layouts at this price, but will receive the 50% discount on every layout ordered. Members will still receive one free shipment per month for up to 20 layouts when their orders reach the existing minimums. If you have already purchased more than 10 layouts for the month and paid a higher price for the additional layouts, you (including customers) will be credited the difference automatically on the credit card used for the transaction.